Showing posts with label cake. Show all posts

Monday, May 7, 2012

How to Make a Rainbow Cake

Step 1:
Mix cake batter and separate evenly into plastic cups.  Add desired food coloring to each cup and stir well.  (I wanted a lot of small sections of color, so I divided the batter into 24 cups, using 6 different colors. So 4 cups of each color.)
image
Step 2:
Pour contents of each cup into pan. For best results, pay close attention to the distribution and arrangement of color. Do not stir or swirl!  To level batter, drop pan forcefully and repetitively on countertop. (Steve came into the kitchen while I was doing this because he thought I was mad and throwing things around. :P)


image

Thursday, February 9, 2012

More Anyklosaurus Cake Pictures

I thought I'd pop on and share some more photos of my Ankylosaurus cake.  I made him sometime last year, which you can read about here.
Enjoy! :)


Belle from Beauty and the Beast Cake : Holly's Birthday (2011)

Hey guys. :)
It's been just about forever since I've posted on here, and I've still got a lot of cakes I've never posted about.  So am I going to be more consistent with this?  I guess we'll just have to wait and see. :P

So, about this time LAST year, my buddy Holly had just turned 22.  So in honor of the event, I made her this surprise Belle cake.

 I used the Wilton doll pan to get the shape of her dress.  The doll is a pick, but the entirety of her dress is made from fondant.

Looking back, I find it amusing that I did all the buttercream details with a medicine syringe.  I made this before I learned anything about piping with pastry bags, so although its kinda shoddy, at least I was innovative. :P


And here she is all lit up. :) 

As for now, I just finished making a peace sign cake, which I'm about to go drop off now... at 4am. :P

More posts soon?  I hope so. :)

Monday, May 23, 2011

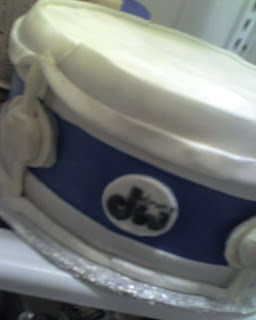
Snare Drum Groom's Cake

My cousin Katy  and her now-husband, Chris, got married last month and asked me to make his groom cake.


It was a great opportunity, but it was also terrifying, since the cake design seemed a bit complicated and out of my comfort zone.  Overall though, I liked how it turned out.  And I actually took process photos this time!


The layers for this came out of the oven almost completely level for once, so it was super easy to put together.  Not to mention I got to use my turntable Christmas Present again. :)

 All frosted in buttercream and into the fridge to set.

Meanwhile, I made some of the smaller details out of white chocolate.  And hours and hours and hours later, it was all finished. :)


Just in time to get a nap in before my hair appointment the next morning. :P

It was a long day, but definitely a great wedding and super fun reception.  Thanks again guys for letting me do this. :) :) :)

Tuesday, May 3, 2011

Andy the Ankylosaurus Cake

This is Andy.  He is an Ankylosaurus. And he is my favorite. <3


He was made at the request of my buddy, Ben, who's love of  ankylosauruses is shown here via awesome dinosaur pajamas.


Andy's final hours were here, at Ben's super dorky cool ;) game night.


This cake was my first real attempt at a shaped cake. (Weelll, I suppose you can count Edgar the Turkey, but Andy was a bit more complicated.)  

And I really like how he turned out. (Even though I think something went wrong with the buttercream recipe on this one...)

So thus ends this lovely story of Andy the Ankylosaurus. :D


The End. :)

Friday, February 18, 2011

Flower Cake: How To Transfer Simple Designs

Sometimes I get really frustrated with having baking for a hobby.   Not because the occasional recipe tastes mysteriously wrong or because some projects can leave me 8+ hours in the kitchen straight.  Nope.  Well..okay, maybe a little.  But the real frustrating reason is the fact that baking can get a bit costly.  There's been quite a few cakes that I would have loved to make in the last month or so, but simply couldn't due to lack of funds.

So why am I pulling the "Boo-hoo, pity me because I'm poor" card right now?  Well, it has to do with this cake:


I made this back in August last year.  I was still really new to cake baking/decorating at the time. ( Heh, I'd still say I'm new actually.)  According to another blog I had at the time, this cake began like this:


"So I was laying around on my computer with Cake Boss playing on the TV in the background. (I kinda sorta hate the Cake Boss. He drives me insane.) And I got the urge to do some baking. I usually just do a boxed cake mix, but since I didn't have one yesterday, I looked up a super simple recipe."
 
Well, to cut the story short ....

Saturday, December 18, 2010

Easy Peasy Pumpkin Squeezy

Whew, I've been neglecting this blog for awhile.  Finals week was awful, so I plan on kicking back and blogging much more often now that winter break is here.  On the downside though, I'm so poor right now that I don't know if I'll be able to buy any of the ingredients for all the super awesome Christmas cakes I had planned...*sigh*

When I last posted, I had mentioned I made several cakes for Thanksgiving.  Well, Cake Number 3 was a lovely pumpkin bundt cake.  I was planning on carving the shape of it myself, but once I come across the idea of using two bundt cakes instead, it was too easy to pass up.  (I was just all caked out at this point.)


Then came my search for the perfect recipe.  I decided on this one from allrecipes.com


Ingredients
* 1 (18.25 ounce) package yellow cake mix
* 1 (3.4 ounce) package instant butterscotch pudding mix
* 4 eggs
* 1/4 cup water
* 1/4 cup vegetable oil
* 1 cup canned pumpkin
* 2 teaspoons pumpkin pie spice
* Whipped cream


Directions


1. In a large mixing bowl, combine the first seven ingredients. Beat on low speed for 30 seconds; beat on medium for 4 minutes. Pour into a greased and floured 10-in. fluted tube pan. Bake at 350 degrees F for 50-55 minutes or until a wooden pick inserted near the center comes out clean. Cool in pan for 15 minutes before removing to a wire rack to cool completely. Serve with whipped cream if desired.


I only had one bundt pan, so it took double the time to bake the two pumpkin halves.  In the meantime, I started working on the frosting.  I thought a cream cheese buttercream frosting would be amazing, so I took a recipe from MarthaStewart.com.  I dyed the majority of it orange, but dyed some green and brown for the stem and leaves, too.  (You just cover an ice cream sugar cone in brown frosting for the stem, sooo simple. :D )


This frosting did taste great, but I had a few issues with it when it came to covering the cake.
When I had both cakes baked and cooled, I put the two halves together with frosting.  This left a very apparent line across the middle of my cake.  When I began to frost the entire "pumpkin" I unfortunately discovered the frosting was too thin to completely hide the cake (and the line across the middle) beneath it.  I struggled with it for a good 30 minutes before just coating the whole thing and giving up.  I was super late for a friend's birthday party at this point, so I left, planning to get home early before my family Thanksgiving to give the cake another coat and to add the vines and leaves.

Except....that never happened.  In fact, I was super late to Thanksgiving too.  (Being late is kind of a thing with me. Heh.)  And! To top it off, some of the cake was eaten before I ever got to take a picture of it. :(


All and all though, I'm okay with how everything turned out.  It was still an orange pumpkin shaped cake with a nice brown stem.  Some vine detailing would have been nice, but that one layer of orange frosting got a bit thicker over night, so I'll take that instead.  Not to mention, I happened to think it tasted preeeettty darn awesome.

So, if you have the time to fiddle with the frosting for this one, I'd recommend it.  It's super simple, just a bit time consuming.

Toodles for now!

<3 Rachel

Monday, November 29, 2010

Turkey Time

As far as cakes go, Thanksgiving week felt a little bit crazy.  Okay, so I only baked three cakes, but I put so much time into these things that I felt super busy all week. 

*ahem*  But without further ado, meet Edgar the Turkey!


Edgar may appear stoic, but he is sad for two reasons: 1. He's upset that I have nothing but a camera phone to "capture his glory". (He's a very arrogant turkey, you see.) and 2. His decapitated head is now chillin' in my freezer. (Pun intended.)

Anywhoooo....

The concept of Edgar began the week before Thanksgiving, as I was announcing to my bestie, Janey, that I was going to make a "pumpkin flavored pumpkin cake" for my mom's Thanksgiving.  To this, Janey replied, "Or how about a turkey flavored turkey cake!"  She was kidding...hooopefully ;)... but when my dad requested a Thanksgiving cake as well, I picked up the idea, minus the turkey flavoring of course. :P


This cake is made mostly out of chocolate cake (the box mix kind, because I'm fancy like that), Scotcheroos, buttercream, and fondant.    I formed the middle part of his body by baking in a 10" round pan, cutting the cake in half, stacking the two halves, and then placing them flat side down.  I used a Bake and Fill pan that I picked up at Goodwill to bake the front part of his body, but I think the same shape could be achieved from smaller round pans cut in half and stacked. 


 His tail-feathers were made out of Scotcheroos, that I pushed into half a saucepan to get the curved shape.  (I think chocolate covered rice krispies would have worked just as well.)  Lastly, his head is made out of an ice cream sugar cone for support and Scotcheroos (minus the chocolate) to give it shape.

It is all covered in fondant and I used the buttercream to coat and paste pieces together.

If you'd like any more directions on how to make yourself an Edgar, feel free to email me.  Also, I'll be happy to share the recipes I used, if you don't feel like waiting for me to post them in a later entry.

Hope everyone had a happy thanksgiving :)
<3 Rachel


Sunday, November 28, 2010

The Cake That Started It All

I've been on Deviant Art for about a year now, and I find it pretty amusing that one of my most popular cakes is still this here Oreo Cake:


The amusing part is it's pretty much the first cake I've ever really taken seriously.  I'm still impressed with it, considering how little I knew about baking at the time, but I think I've done better work since.  For some reason though, "Oreo Cake" is still getting a lot of attention. 

I thought this would make a really good first entry since its probably the easiest cake I've done and I've had a few people ask how to get the finished product. (Not to mention, I learned a few reaaally helpful things while baking this.)  I think I'll do this in the form of a lovely little story:

Once upon a time...

(It's a meeee!)

...there was a silly girl named Rachel who happened to have a crush on an even sillier boy named Steve.  It was the middle of a lovely summer, and Steve and his friend J.'s hair was getting a little too long for Rachel's tastes.  In a half joking tone, Rachel said she would reward the two boys with cakes if they committed themselves to getting haircuts. They accepted and soon Rachel found herself with two cakes to bake.  J, not being a fan of frosting, requested a pineapple upside down cake.  

(My buddy/assistant chef Holly!)

Steve, on the other hand, certainly did not have an aversion to frosting. In fact, he loved it!  (And still loves it for that matter. :P)   Baking for such a fan of sweets, Rachel took the second cake very very seriously.  Here's a few of the things she discovered in preparation for his cake:

  1. To avoid getting a really lumpy cake.  Don't over-mix the batter.  Also, setting the cake on a piece of aluminum foil in the oven will help distribute the heat beneath it more evenly.
  2. Leveling the two layers before stacking makes a much more presentable cake.  Use a big bread knife or thread pulled tightly to cut off any lumps. Then stack the layers with the cut side facing the middle.
  3. Adding dry pudding mix to a box cake makes the finished product much more moist.
Most of what she found was probably pretty common knowledge, but Rachel had never heard these things before; They certainly did make a difference.   

So Rachel invited here two best buds over, Janey and Holly, and they began to bake.  To make the Oreo Cake, they simply used a chocolate box mix, followed the instructions, and added a box of chocolate pudding mix.  Rachel applied the above information to bake and assemble the cake, and then very carefully covered it in plain ole' store bought vanilla frosting.  She tore apart a few oreos and lined them up on the sides of the cake, and then commissioned her friends to do some oreo smashing in plastic bags: 


Rachel sprinkled the crushed Oreo on top of the cake, and wa-lah! The Oreo Cake was done!

And  a month (and a bit of drama) later, Rachel and Steve were happily dating.  And still are. :)  Oh, and Rachel kinda sorta loooves to bake now.


The End


See! Wasn't that nice?  Like I said, super easy, since none of it's really from scratch.  But in the end, you still have yourself a pretty impressive little cake.

Try it yourself and enjoy!

-Rachel :)